

 This primer has been on the Internet in one form or another for many years now, it was written by me, back when I used to make 5 loaves of bread, rolls and breadsticks every week. I do not bake this type of bread anymore since most everyone in my family either has Celiac disease or is gluten intolerant, but I thought I would share this for those of you that need a simple recipe to follow.
Tomorrow I will post part 2 which is the variations I have used this recipe for over the years, including hamburger buns, rolls, breadstick, hot dog buns, and cinnamon bread. I miss baking bread such as this so I hope that you enjoy this primer as much as I enjoyed writing it.
BASIC WHITE BREAD PRIMER
-I am going to use an Amish white bread recipe for this primer. For two reasons one- it is one of the easiest recipes, and two I use it for all my basic bread stuffs, including rolls, hot dog buns and hamburger buns.
-As you become comfortable with this recipe you can add a cup of whole wheat flour if you wish, I often add 2 cups of whole wheat and then a bit of vital wheat gluten(available in health food stores) to make it rise well.
Before we get to the recipe a few things you need to know. The most important things to keep in mind are water temp, fresh yeast, kneading time, and the condition of the dough after it has been kneaded.
Ingredients
-You can use any kind of flour, if you have access to bread flour at a reasonable price I suggest that you try it, it is not necessary, but it gives that dough just a bit more of an oomph. It is higher in gluten, the substance that bread needs to rise nice and light and fluffy. If you are like me and are after the lightest fluffiest loaf of bread ever, then you may way to give it a try. If you cannot find it but want that oomph you can try vital wheat gluten about 2 teaspoons will do it.
-Your yeast should be fresh, you can check it by dissolving it in very warm water, to see if it gets foamy, if it does, then it is fine. I use instant yeast, which I am able to get in large quantity, and I keep it in the freezer, except for a small jar that I keep in the fridge. The most common yeast available here in the United States is Active dry, which most professionals will tell you that you need to activate in warm water before you use, I did not always do that, and my results were always good. The instant yeast never needs to be dissolved first; I add it to my dry ingredients.
-Many people do not realize that with most of your typical breads, sweeteners and fats are pretty interchangeable, if you prefer olive oil then by all means use it, if you like butter then use that, and if you would rather have honey rather than sugar then go for it. For the most part they can all be interchanged with only a little difference in texture, you do need to adjust your liquid to dry ratio a bit if you switch from a liquid sweetener or fat to a solid one.
-Water should be very warm without being hot… for beginners buy an instant read thermometer (small round head with a long stem) they are usually 5$ at Wal-Mart or Kmart, and check till you become comfortable with the temp of water. If you make it to cool it will make the yeast very sluggish and it will take forever for the dough to rise, I do not have that kind of time so I make mine very warm. If however, you make your water to hot, you will kill your yeast. Recipes vary but usually between 100- 120 is the norm, most recipes call for. I notice that in the bread maker if you choose to use this, it is actually a little lower, between 80 and 100.
-Weather can greatly affect bread making, if it is cold it will take longer to rise, if it is dry you will need to add more liquid or less flour. Bread likes warm, humid conditions, if it is drafty in your house or you just can’t get your bread to rise, you can make a makeshift proofer by placing a pan of boiling water on the bottom rack of your oven, the warmth of the boiling water and or the light bulb in your oven will provide enough heat. Sometimes if it is a bit chilly in my house I will turn my oven on for about 15 minutes and turn it off then place the bread on the top of my stove on a cooling rack not directly on the stove.
You can use the top of your dryer as well, just be sure to place it on a cooling rack so that it does not get too hot. You will have to experiment, just be sure that it doubles in bulk and that when you press it in the middle with two fingers the indents stay. I find for me that rising times vary greatly, in the summer it may take 30 minutes whereas in the winter it may take up to two hours, don’t let it worry you it will get there eventually.
Kneading Your Dough
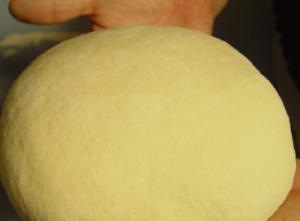 – Kneading is very important as well, if the bread is not properly kneaded then the gluten is not developed and the bread will not rise properly or have the texture you are looking for. When the bread is kneaded properly the strands of gluten will be very long and elastic, the bread will be smooth and soft as a babies bottom.
If you take a piece of the dough, about the size of a plum you should be able to stretch it out so that it is as thin as a membrane and you can see light thru it. If it tears before this, then that you need to knead it some more. Kneading for those who have never made bread before goes like this.

Lay the dough in front of you, pull the part farthest away from you toward you, folding the dough in half, then using the heel of your hand push down and away from you. Now turn the bread a quarter of a turn and repeat. What you are basically doing is stretching those gluten fibers over and over again and the more you stretch them the more elastic they become.
If the dough starts to become really stiff and tight, cover it with a towel and let it relax a few minutes, this relaxes the gluten and allows you to knead it again.
At first when you begin to knead the dough will be very sticky, coat your work surface with flour and your hands, as more and more flour gets incorporated and your dough gets less sticky, be careful to add less flour. The dough should remain slightly sticky, but should come to a point where it no longer leaves itself on the work surface and on your hands, it should in fact clean the bits of dough off the work surface. The dough will be tacky to touch.
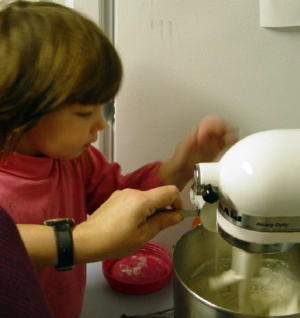
Be sure that you work in each addition of flour thoroughly before you add more. I use a kitchen aide mixer for the mixing and the first half of the kneading, it is helpful to spray the dough hook with cooking spray, it keeps the dough from riding up the hook and allows it to knead better.
You will continue to add flour to the dough until the dough pulls completely away from the side of the bowl and the sides of the bowl are clean. Be careful it is very easy to add too much flour, as it gets close to being done, but if by chance you do add too much flour you can add a bit more liquid to get it back to where you want it.
I usually will take the dough out of the mixer and continue to knead it by hand, it is easy to get lazy at this point, but if you watch as the dough hook kneads the dough in the mixer you will notice that not all of the dough gets kneaded as well, I really feel like this affects the ultimate quality of the bread, and in fact if you do the test, to see if the dough is ready most times you will find that it is not.
I am a bit of a perfectionist here, I really love the ultimate bread, and I love baking it, and it is all the little details that make it the kind of bread that will get you the oooo’s and ahhhh’s of amazement from family and friends.
Rising Your Dough
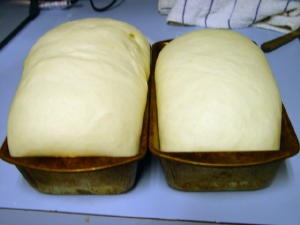 – With most breads there is usually two rising periods the first is in its raw form, in a bowl, let it double in size, regardless of the amount of time that it takes. The second rising occurs after the dough is formed into its final form. When I bake bread I usually let it rise to just over the top of the pan, before I place it in the oven, the final rising time will vary depending on what you are making, many things such as bagels are half proofed. I don’t allow English muffins very much proofing time either.
Be sure that you cover your bread with a cloth or plastic wrap, as it dries out very easily. Also always grease your bowl before you place it in there to rise. I usually use either glass or metal, I do not like using plastic, it does not seem to rise as well.
When you bake your bread place it on a center rack if you place more than two loaves on there you may need to rotate them part way thru the baking, as they may not bake evenly if you do not. If you like crusty bread that one way to achieve that, is to place a pan of boiling water in the bottom of your oven, when you preheat it, the added moisture will make your bread much crustier, you can also spray the bread as soon as you place it in the oven for a bit of added moisture.
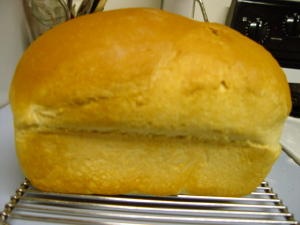
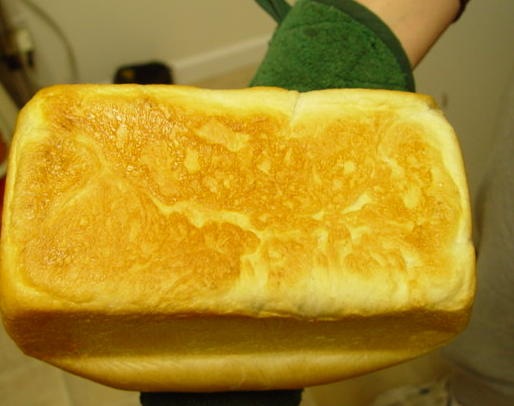 You will know that your bread is done, when it is a golden brown, when you take it out of the pan the bottom will also be a golden brown and if you tap the BOTTOM of the bread it will sound hollow. When your bread is finished you will want to remove it from the pan immediately, if you do not it will sweat in the pan and it will ultimately make the bread soggy.
Do not cut in to your bread for the first 20 minutes, it needs a bit of time to cool and it continues to cook even after it is out of the oven. If you just can’t wait then give it about ten minutes and if you are careful you should be able to cut into it.
Here is the basic Amish white bread it is my staple, and I make several variations that I have adapted personally to it, which I will post tomorrow.
 Amish White Bread
2 cups warm water
5 T sugar
1 1/2 T yeast
1 1/2 t salt
1/4 cup oil
5-6 cups flour
In a large bowl, dissolve the sugar in warm water: add yeast. Mix in salt and oil. Work in the flour until dough no longer looks wet.(I use an instant yeast and add it to all the dry ingredients only using 2 cups of flour to start and then adding the wet ingredients, I mix it for a couple of minutes until it is smooth and then begin adding the flour a bit at a time.)
Knead on a floured surface until smooth. Place in a well oiled bowl, turning to coat dough with oil. Cover and allow to rise until doubles, about1 hour(or until two fingers pushed in leave an indent that does not go away) Punch dough down. Knead again and divide in half. Shape into two loaves and place in well oiled loaf pan. Allow to rise for another hour.
Bake at 350 degrees for about 30 minutes. Loaves will be golden brown and sound hollow when done.
I hope that you have enjoyed my primer, tomorrow I will post my variations to this recipe. Happy Baking!!!
Where do you get fifty pounds of flour for just seven dollars?
My apologies, this was an old post, I tried to edit things to update the post but missed that one. I used get all my flour at a restaurant supply store out west called URM, tha was about 5 years ago though. I am really not sure how much it is now because we moved so I just edited that link out.