If you’re trying to get control of your finances, one of the best things you can do is to make sure that you are balancing your checkbook every single month. Even if you do your checking online, it’s important to do this not only so you can track exactly how much money is in your account, but so that you know where all your money is going and ensure that you’re the only one spending anything.
And, contrary to popular belief, there’s nothing actually all that difficult about balancing your checkbook, and you don’t even have to do it all that often—just once a month, and it shouldn’t take more than 10-15 minutes, depending on how often you used your debit card that month.
What you need
- a paper or electronic checkbook register (I suggest this app if you prefer electronic)
- a writing utensil
- a calculator
- your receipts
- your bank statement
Step 1: Understand the Checkbook Register columns
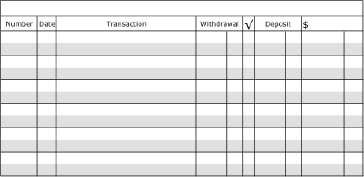
If you look at a checkbook register, you’ll see eight to ten columns with rows that are alternating colors. It might look a little confusing at first, but it’s not as bad as it looks. We’ll go through the columns in the order they generally appear, with possible titles as every register is just a little different.
Here’s an example of what your register might look like:
- Number or Code – This is where you can record the number on any check that you use. Some registers also have a list of codes that can be put in this box. Examples include AP – Automatic Payment, ATM – Cash withdrawal, DC – Debit Card, etc.
- Date – This is the date of the transaction. It should match the receipt.
- Transaction – Write a description of the transaction. I usually include where I was, and what I bought; ie “shoes”, “food”, or “lunch”.
- Payment, Fee, Withdrawal, or Debit – (two columns) – This column is for any transaction that takes money out of your account. Put the dollar amount in the larger box, and the change in the smaller box.
- √ – This column is for when you are actually balancing your checkbook. All transactions that have cleared should get a check or an X in this box
- Deposit, Credit, + (two columns) – This is for any transaction that put money into your account. Put the dollar amount in the larger box and the change in the smaller box.
- Balance, $ – This is a running total of your account. You should have a starting balance, and each line after that will either add (credit) or subtract (debit) to create a total of your finances.
Step 2: Enter all transactions
This is probably the most tricky part of the whole thing, as you have to either save your receipts somewhere until you can write it down, or else add them to the register while you stand in line. Personally, I simply purchased a wallet with two cash slots, and one is for cash while the other is for receipts, and I simply balance them out every couple of weeks, or as needed.
Step 3: Balance or Reconcile using your Bank Statement
Once a month, you’ll either be mailed your account statement or, more likely, have it made available to you online. When this happens, you should go through all of the debits and credits that show up and make sure that they match what you have in your book. If you are missing any, or have a balance discrepancy, either go back through your receipts to check that you didn’t transpose a number, or else try and track down where the mistake is. Should you discover any major discrepancy that you don’t remember, contact your bank immediately.


